使用mitmproxy及flask分别实现了2个功能程序(一个做代理抓包运行在8080端口、一个做web程序运行在80端口)想要通过运行一个python程序来同时提供这2种功能,就搜了下python下的多线程和多进程实现。
一、已知mitmproxy下可以托管WSGI应用程序(参考官方案例wsgi-flask-app.py)
#wsgi-flask-app.pyfrom flask import Flaskfrom mitmproxy.addons import asgiappapp = Flask("proxapp")@app.route('/')def hello_world() -> str:return 'Hello World!'addons = [# Host app at the magic domain "example.com" on port 80. Requests to this# domain and port combination will now be routed to the WSGI app instance.asgiapp.WSGIApp(app, "example.com", 80) #example.com只是示例, 也可以改成任何域名比如ranjuan.cn,只要访问你设置的域名mitmproxy都会转发到flask上!# SSL works too, but the magic domain needs to be resolvable from the mitmproxy machine due to mitmproxy's design.# mitmproxy will connect to said domain and use serve its certificate (unless --no-upstream-cert is set)# but won't send any data.# mitmproxy.ctx.master.apps.add(app, "example.com", 443)]
上面这个wsgi-flask-app.py案例片段,事实上相当于把flask整合到mitmproxy的流程中了。也就是说flask提供的web服务必须依赖于请求经过mitmproxy!如果你用浏览器不配置代理直接访问flask端口是无法响应的!它的主要功能可以用来实现接口mock(就是你在flask上做好接口实现,然后mitmproxy将所有经过它访问example.com的请求全部会转发到flask上而不是去直接请求真实的example.com这个域名!)
二、使用多线程或进程同时启动2种服务的准备工作
1、mitmproxy程序文件mitmApp.py
from loguru import loggerimport asynciofrom mitmproxy.options import Optionsfrom mitmproxy.tools import dumpimport mitmproxy.httpclass Action1:def request(self, flow: mitmproxy.http.HTTPFlow):logger.warning(f'{flow.request.url}, Beg---')returndef response(self, flow):#flow.response = flow.response.make(404)#返回404return#这里的addons 是给mitmdump -q -s main.py命令执行方式用的addons = [Action1(),#Action2()]async def func_temp(host, port):opts = Options(listen_host=host, listen_port=port)# with_termlog设置为True会显示运行中mitmproxy遇到的错误;with_dumper是用来控制是否显示每个请求相关信息的dm = dump.DumpMaster(opts, with_termlog=True, with_dumper=False)# python脚本直接运行需要按如下格式一个一个add添加dm.addons.add(Action1())# dm.addons.add(Action2())try:await dm.run()except BaseException as e:print(e)dm.shutdown()def m():logger.info('正在启动mitmApp……')asyncio.run(func_temp('127.0.0.1', 8080))if __name__ == '__main__':m()
2、flask程序文件flaskApp.py
from loguru import loggerfrom flask import Flaskapp = Flask("apptest")@app.route('/')def hello_world() -> str:logger.info('flask in')return 'Hello World!'def f():app.run("127.0.0.1", 80)if __name__ == '__main__':#app.run("127.0.0.1",80)f()
上面这2个程序文件都可以单独运行,运行后分别访问127.0.0.1+端口号即可访问对于服务。
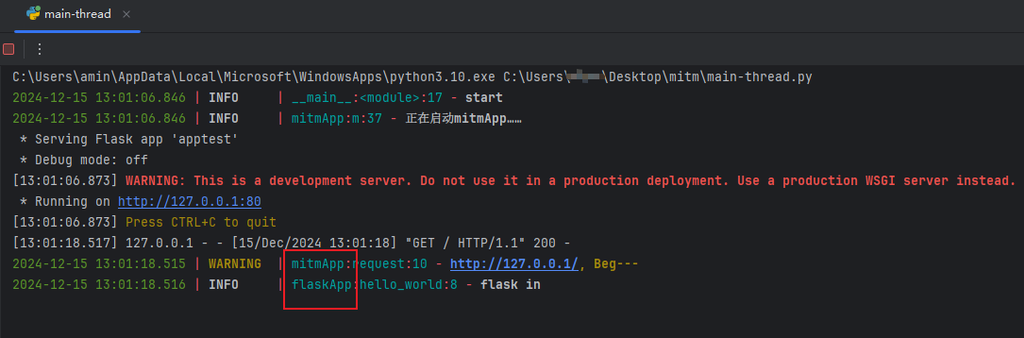
三、使用python多线程直接启动2服务
main-thread.py直接运行即可
from loguru import loggerimport threadingimport flaskAppimport mitmAppdef main():th2 = threading.Thread(target=mitmApp.m, name="t2222", daemon=True)th2.start()th1 = threading.Thread(target=flaskApp.f, name="t1111", daemon=True)th1.start()# 等待所有线程结束for t in (th1, th2):t.join()logger.info('zhu end')if __name__ == '__main__':logger.info('start')main()
四、使用python多进程直接启动2服务
main-process.py直接运行即可
from loguru import loggerimport multiprocessingimport flaskAppimport mitmAppdef main():p2 = multiprocessing.Process(target=mitmApp.m,)p2.start()p1 = multiprocessing.Process(target=flaskApp.f,)p1.start()# 等待所有进程结束for process in (p1,p2):process.join()logger.info('zhu end')if __name__ == '__main__':logger.info('start')main()
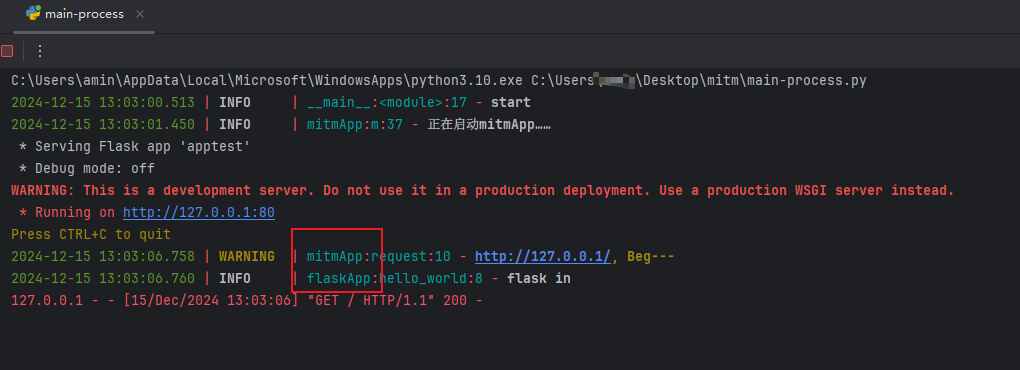

因为这2个服务相对独立,也不涉及到共享数据访问或通信相对还是比较简单的。

发表评论