mitmproxy入门三、直接python脚本运行&常用http处理方式
在mitmproxy入门第一篇中讲到通过类似“mitmdump -q -s main.py”这种命令可以实现脚本工作,其实也可以直接以运行python脚本的方式启动。本文为mintmproxy 版本10、python3.10
一、直接运行python文件启动
主入口参考文件main.py
import mitmproxy.http
from mitmproxy import ctx, http

#import threading
import asyncio
from mitmproxy.options import Options
from mitmproxy.tools import main
from mitmproxy.tools import dump

import action1
import action2

#这里的addons 是给mitmdump -q -s main.py命令执行方式用的
addons = [
    action1.Action1(),
    action2.Action2()
]

if __name__ == '__main__':
    #from mitmproxy.tools.dump import DumpMaster
    async def func_temp(host,port):
        opts = Options(listen_host=host, listen_port=port)
        #with_termlog设置为True会显示运行中mitmproxy遇到的错误;with_dumper是用来控制是否显示每个请求相关信息的
        dm = dump.DumpMaster(opts, with_termlog=True, with_dumper=False)
        # python脚本直接运行需要按如下格式一个一个add添加
        dm.addons.add(action1.Action1())
        dm.addons.add(action2.Action2())
        #print(dm.addons)
        #dm.addons.add([action1.Action1(),action2.Action2()])#这种语法不行
        #dm.addons = [
        #   action1.Action1(),
        #    action2.Action2()
        #]#这种也不行

        try:
            await dm.run()
        except BaseException as e:
            print(e)
            dm.shutdown()
    asyncio.run(func_temp('127.0.0.1', 8080))
参考action1.py
import mitmproxy.http
from mitmproxy import ctx, http

class Action1:
    def request(self, flow: mitmproxy.http.HTTPFlow):
        print("这里是action11----------")
        print(flow.request.host)
        #t = 1/0
        #flow.response = http.Response.make(200,"111",)
        return

    def response(self, flow):
        #t =1/0
        #flow.response = http.Response.make(200,"111+111",)
        return
参考action2.py
import mitmproxy.http
from mitmproxy import ctx, http

class Action2:
    def request(self, flow: mitmproxy.http.HTTPFlow):
        print("这里是action22----------")
        print(flow.request.host)
        #t = 1/0
        #flow.response = http.Response.make(200,"222",)
        return

    def response(self, flow):
        #t =1/0
        #flow.response = http.Response.make(200,"222+222",)
        return
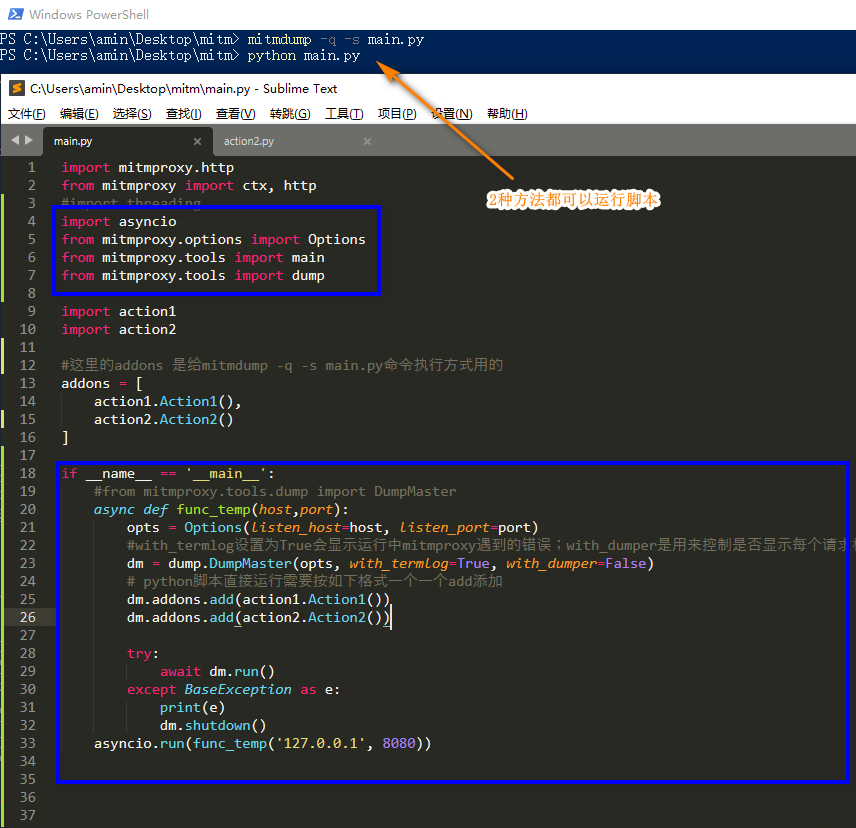
上图蓝色框的是如果要直接在python脚本中运行所需添加的内容格式。
二、常用的操作http请求的示例
直接在上面action1.py里面做下修改,可以方便地进行测试(测试代码有点乱)
import mitmproxy.http
from mitmproxy import ctx, http
import time
class Action1:
    def request(self, flow: mitmproxy.http.HTTPFlow):
        #flow.request.host='www.google.com'
        #t=1/0
        #print("请求将被kill,后续将不会有response")
        #flow.kill()

        if 'action' in flow.request.url:
            print("触发了拦截,会阻塞后面的请求,即使请求不进入本逻辑")
            flow.intercept()
            a = input("输入1 放行: ")
            if a=='1':
                #time.sleep(20)
                flow.resume()#继续流动 - 在一个intercept()之后调用
            else:
                print("输入不是1,此请求不再放行")
        else:
            print("不拦截")

        #pretty_host #类似于host,但使用主机头作为附加的首选数据源。这在透明模式下很有用,host只有IP地址,但可能不会反映实际的目的地,因为主机头可能被欺骗。
        flow.request.method #请求方式。POST、GET等
        flow.request.scheme #什么请求 ,应为“http”或“https”
        #flow.response = http.Response.make(200,"111",)
        flow.request.query #返回MultiDictView类型的数据,url直接带的键值参数
        flow.request.query.keys()#取得所有请求参数(不包含参数对应的值)
        print(list(flow.request.query.keys()))
        print(" ")
        act1 =flow.request.query.get('action')#取得请求参数wd的值
        print(f"act1={act1}")

        #flow.request.query.set_all(key,[value])#修改请求参数
        flow.request.query.set_all('action',['edit-action'])
        act2 =flow.request.query.get('action')
        print(f"act2={act2}")

        flow.request.cookies["log_id"] = "007"#修改cookie
        flow.request.get_content()#bytes,结果如flow.request.get_text()
        flow.request.raw_content #bytes,结果如flow.request.get_content()
        flow.request.urlencoded_form #MultiDictView,content-type:application/x-www-form-urlencoded时的请求参数,不包含url直接带的键值参数
        flow.request.urlencoded_form["code"] = "123456"#修改或赋值
        flow.request.urlencoded_form = [("code", "123456"),("name","lucy")]
        flow.request.multipart_form #MultiDictView,content-type:multipart/form-data
        return

    def response(self, flow):
        #t =1/0
        #flow.response = http.Response.make(200,"111+111",)
        #flow.response = flow.response.make(404)#返回404
        #print(flow.response.headers)
        for (k,v) in flow.response.headers.items():
            print(f"{k}:{v}")
        print(" ")
        #print(flow.response.get_text())
        flow.response.status_code #状态码
        flow.response.text#返回内容,已解码
        #print(flow.response.text)#返回内容,已解码
        flow.response.content #返回内容,二进制
        #flow.response.setText()#修改返回内容,不需要转码
        flow.response.set_text(flow.response.get_text().replace('<title>', '<title>返回title——'))
        flow.response.headers["isMitmproxy"]='yes'#给返回添加返回头
        #读取文件,在当前文件路径下执行脚本,否则需要写文件的绝对路径;不然会找不到该json文件
        with open('1.json','rb') as f:
            #从json文件中读取数据成python对象
            res = json.load(f)
        #将读取的python对象转成json字符串发送给客户端
        flow.response.set_text(json.dumps(res))
        return
如果是接口测试用,有时候需要利用postman或其他apifox、apipost之类的工具导入接口,手动创建接口参数这些填写很麻烦,即使curl导入也不太方便,这时候我们可以把经过mitmproxy代理的相关参数进行整理并打印出来,然后复制到软件中。
    def request(self, flow):
        # 请求
        ctx.log.error(f"【1】请求url:{flow.request.url}")
        ctx.log.error(f"【1】请求url(某些情况下地址是ip这时需要取pretty_url):{flow.request.pretty_url}")

        ctx.log.error(f"【1】请求host:{flow.request.host}")
        ctx.log.error(f"【1】请求host(某些情况下地址是ip这时需要取pretty_host):{flow.request.pretty_host}")
        ctx.log.error(f"【1】请求路径:{flow.request.path}")
        ctx.log.error(f"【1】请求content:{flow.request.content}")
        ctx.log.error("请求参数Params:")
        for k in flow.request.query:
            ctx.log.error(f"{k}:{flow.request.query[k]}")
        ctx.log.error(" ")
        ctx.log.error(f"【2】请求Cookie:")
        for k in flow.request.cookies:
            ctx.log.error(f"{k}:{flow.request.cookies[k]}")
        ctx.log.error(" ")
        ctx.log.error(f"【3】请求头:")
        for k in flow.request.headers:
            ctx.log.error(f"{k}:{flow.request.headers[k]}")
        ctx.log.error(" ")
        if 'Content-Type' in flow.request.headers:
            ctx.log.error(f"【4】请求类型:{flow.request.headers['Content-Type']}")
        else:
            ctx.log.error(f"【4】请求类型:无")
        #body 需要根据Content-Type去生成
        ctx.log.error("")
        ctx.log.error(f"【5】请求体文本:{flow.request.get_text()}")
        ctx.log.error("")
        if 'application/x-www-form-urlencoded' in str(flow.request.headers):
            #s = urllib.parse.unquote(flow.request.get_text().replace("=",":").replace("&","rn"))
            #ctx.log.error("【6】请求体x-www-form-urlencoded:n"+s)
            ctx.log.error("【6】请求体x-www-form-urlencoded:")
            for k in flow.request.urlencoded_form:
                ctx.log.error(f"{k}:{flow.request.urlencoded_form[k]}")
            ctx.log.error("")
        elif 'application/json' in str(flow.request.headers):
            ctx.log.error("【6】请求体json:n"+flow.request.get_text())
        else:
            ctx.log.error("【6】获取请求体失败,或请求体格式暂不支持")
        ctx.log.error("")
        pass
三、处理请求时常用的代码片段(收集自网络)
1、将url参数转为字典
    from urllib.parse import parse_qs, urlparse
    url = 'https://www.test.com?action=add&id=007&user=&wd=&action=add2'
    query = urlparse(url).query
    print("原始url:"+url)
    params = parse_qs(query)
    print(params)
运行结果:
原始url:https://www.test.com?action=add&id=007&user=&wd=&action=add2
{'action': ['add', 'add2'], 'id': ['007']}
2、将字典转为url参数
    from urllib.parse import urlencode
    params = {'action': 'add', 'id': 2}
    result = urlencode(params)
    print(result)
运行结果:
action=add&id=23、过滤函数,在所有处理请求前先过滤不匹配条件的请求
    def allowed_urls(ori_str):#判断提供的字符串/url 是否符合匹配条件
        check_dic=["ranjuan","ntest"]#需要包含的关键字
        check_pass=["act","99"]#需要排除的关键字, 匹配条件是既需要包含关键字,又不能出现要排除的关键字
        #return all(any(i in j for j in bvalue) for i in avalue)
        if any(e in ori_str for e in check_dic):
            if any(e in ori_str for e in check_pass):
                return False
            else:
                return True
        return False

    print(allowed_urls('http://ranjuan.cn?ction=1')) #True
    print(allowed_urls('http://ranjuan.cn?action=1'))#False
    print(allowed_urls('http://ranjuan.cn?cction=199'))#False
    print(allowed_urls('http://ranjuantesst.cn?ction=1'))#True
    print(allowed_urls('http://rantestjuan.cn?ction=1'))#True
4、md5函数
    import hashlib
    stringA='123456'
    str_md5 = hashlib.md5(stringA.encode(encoding='utf-8')).hexdigest()
    print(str_md5)
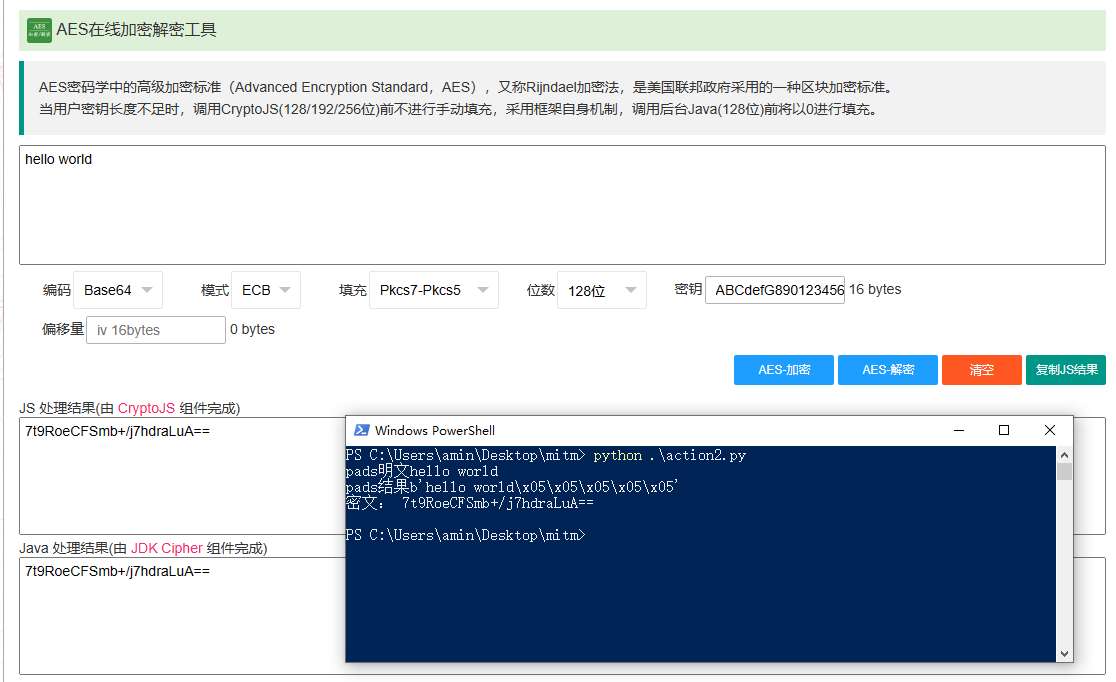
5、AES加密函数
2024.10更新:python中如果用AES模块按下面方法还是不行,建议直接先卸载crypto,pycrypto;卸载完毕后只要直接安装pycryptodome即可(腾讯云函数python3.9环境 测试成功【pip install pycryptodome -t .】)!
aes加密使用会有一些坑,第一个就是python模块安装crypto后需要重命令相关的2个文件夹名字(首字母改成大写),然后再安装pycryptodome模块。另外就是密钥key建议一定要用16位长度,否则跨语言进行AES加解密时会自己python上写的可以加解密,但是对方那边就是解密不了(对方在自己的开发语言里面加解密也是正常的)。如果长度确实不够,那么填充key的方式两边需要确保一致才行!
    def pads(text,length=16):
        """
        #填充函数,使被加密数据的字节码长度是block_size的整数倍
        """
        print(f"pads明文"+str(text))
        count = len(text.encode('utf-8'))
        add = length - (count % length)
        entext = text + (chr(add) * add)
        print(f"pads结果"+str(entext.encode("utf8")))
        return entext.encode("utf8")


    from Crypto.Cipher import AES
    import base64
    #1、pip install Crypto
    #2、要去安装目录下把两个crypto的文件夹(我这是crypto、crypto-1.4.1.dist-info)首字母大写后再安装pycryptodome。
    #3、pip install pycryptodome
    #
    text = 'hello world'
    password = 'ABCdefG890123456' #秘钥,b就是表示为bytes类型;限制为16
    aes = AES.new(password.encode('utf-8'),AES.MODE_ECB) #密码正好长度为16时可不用填充,一定要16位很关键
    en_text = aes.encrypt(pads(text)) #加密明文
    encrypted_text = str(base64.encodebytes(en_text), encoding='utf-8')
print("密文:",encrypted_text) 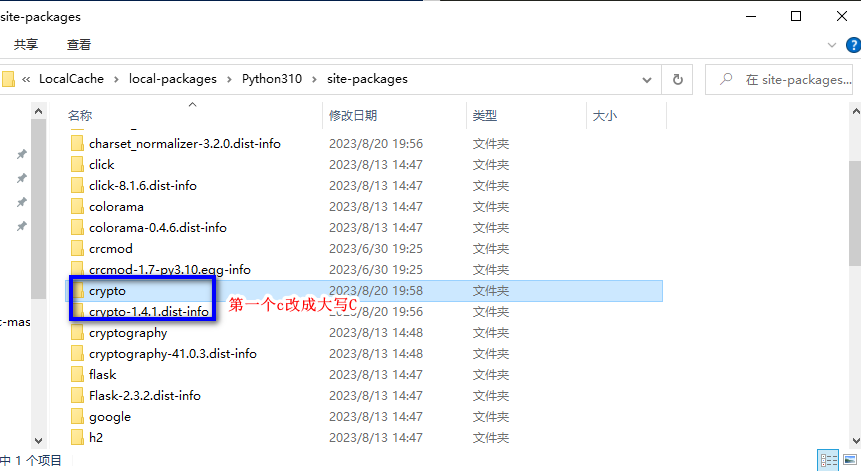

发表评论